
Settings → Import → WHMCS Migration copies your WHMCS data into your Hostinvo workspace. Hostinvo connects to the WHMCS MySQL database with the details you give it, reads the data, and creates the same clients, products and services here. Nothing is changed in WHMCS, and nothing is created on your servers.
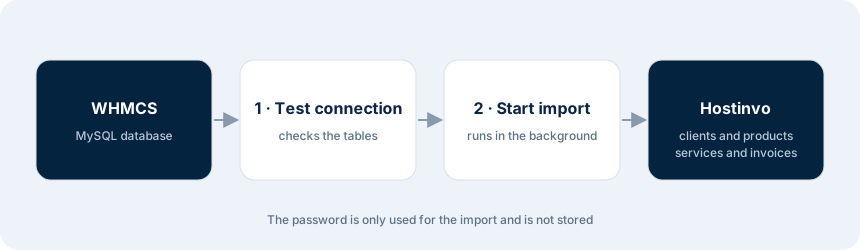
What is imported
| WHMCS | In Hostinvo |
|---|---|
| Clients | Name, company, email, phone, country and billing address. Each client also gets a client-area login, without a password: they set one with Forgot password. |
| Product groups | Created as product groups. |
| Products | Created with their prices. A product with no price gets a default price you can edit. |
| Services (hosting) | Created with their status, billing cycle, next due date and domain, so renewals continue. Active and Suspended stay as they are; Terminated, Cancelled and Fraud become Terminated; anything else becomes Pending. |
| Invoices and invoice lines | Created with their totals and paid status, when the tables exist. |
| Transactions | Created as payments and transactions, when the table exists. |
Before you start
- The WHMCS database details. They are in configuration.php in your WHMCS folder: $db_host, $db_port, $db_name, $db_username and $db_password.
- A MySQL user that can read the WHMCS database. A read-only user is best (example below).
- The Hostinvo server must be able to reach the WHMCS MySQL server. If WHMCS is on another server, allow remote MySQL connections from your Hostinvo server's IP address.
- On your own Hostinvo server, the queue worker must be running: the import runs in the background.
Example: a read-only MySQL user for the import (run on the WHMCS MySQL server)
CREATE USER 'whmcs_reader'@'203.0.113.10' IDENTIFIED BY 'a-long-random-password';
GRANT SELECT ON whmcs.* TO 'whmcs_reader'@'203.0.113.10';
FLUSH PRIVILEGES;
Replace 203.0.113.10 with your Hostinvo server's IP address and whmcs with your WHMCS database name. You can delete this user when the import is done.
Step by step
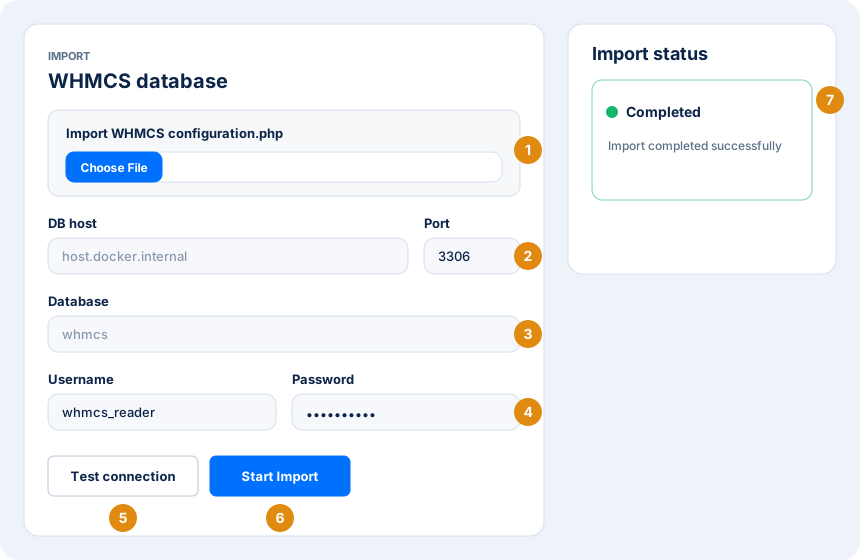
- 1
Fill the fields from configuration.php (optional)
Choose your WHMCS configuration.php file. It is read in your browser to fill the fields below; it is not uploaded or stored. If the file says localhost, the host is changed to host.docker.internal: that is only right when WHMCS runs on the same machine as Hostinvo. Otherwise put in the WHMCS server's address (see the examples).
- 2
DB host and Port
The address of the WHMCS MySQL server, e.g. whmcs.example.com or 198.51.100.20. The port is usually 3306.
- 3
Database
The WHMCS database name ($db_name), e.g. example_whmcs.
- 4
Username and Password
The MySQL user that can read the database. The password is only sent to the import job and is not saved.
- 5
Test connection
Checks that Hostinvo can connect and that the WHMCS tables are there (tblclients, tblproductgroups, tblproducts, tblhosting). You should see: Connection successful. Required WHMCS tables were found.
- 6
Start Import
Queues the import. The button shows Import running until it finishes.
- 7
Watch Import status
The status box on the right refreshes by itself every few seconds: Pending, then Running, then Completed or Failed with the reason.
Example 1: WHMCS on cPanel hosting
configuration.php on the WHMCS server
$db_host = 'localhost';
$db_port = '';
$db_username = 'example_whmcs';
$db_password = '********';
$db_name = 'example_whmcs';- localhost here means the WHMCS server itself, so in Hostinvo enter the server's address instead, e.g. DB host = server1.example-host.com, Port = 3306.
- In cPanel → Remote MySQL, add your Hostinvo server's IP address, otherwise the connection is refused.
- Database = example_whmcs, Username = example_whmcs (or your read-only user), Password = the database password.
- Test connection, then Start Import.
Example 2: WHMCS and Hostinvo on the same machine
When Hostinvo runs in Docker and WHMCS's MySQL runs on the same machine, use DB host = host.docker.internal and Port = 3306. When WHMCS's MySQL runs in another Docker container, use that container's service name as the host.
Example 3: MySQL is not open to the internet
If your host does not allow remote MySQL, open an SSH tunnel from the Hostinvo server to the WHMCS server and point Hostinvo at the tunnel. Keep the tunnel open until the import completes.
On the Hostinvo server
ssh -N -L 0.0.0.0:3307:127.0.0.1:3306 user@whmcs-server.example.comThen use DB host = host.docker.internal (or the Hostinvo server's IP) and Port = 3307.
Import status
| Status | Meaning |
|---|---|
| Pending | Queued, waiting for the queue worker. If it stays here, the queue worker is not running. |
| Running | Reading WHMCS and writing to Hostinvo. Large databases can take a few minutes. |
| Completed | Everything was imported. |
| Failed | Nothing was imported: the whole import is one step, so a failure leaves no half-imported data. The reason is shown; fix it and start again. |
After the import
- Tell your clients to sign in with Forgot password: their WHMCS passwords cannot be moved.
- Check Products: prices and billing cycles, especially products that got a default price.
- Services are records only, not yet linked to your servers. Add your Plesk server under Servers first, then link them in one of the two ways below.
- Running the import again is safe: clients are matched by email and records by their WHMCS ID, so they are updated, not duplicated.
Linking imported services to Plesk
Each imported service is matched to a Plesk subscription by its domain, or by its username, and linked to that server. No account is created or changed in Plesk. Choose either option; both do the same thing.
- 1
Option 1: the button
Open Servers → your Plesk server. In Link services imported from WHMCS, press Link services now. The result shows how many services were linked and how many were not found on that server.
- 2
Option 2: the command
On your Hostinvo server, in the Hostinvo folder. The server page shows this command with the server's ID filled in, ready to copy; --all links every Plesk server at once.
docker compose -f docker-compose.prod.yml exec app php artisan plesk:sync-services --server=SERVER_ID
docker compose -f docker-compose.prod.yml exec app php artisan plesk:sync-services --all
Troubleshooting
| Message | What to do |
|---|---|
| Unable to connect to the WHMCS MySQL host | The host is wrong or is localhost. Use the WHMCS server's address, or host.docker.internal when both run on the same machine. |
| Access denied for user | Wrong username or password, or the user is not allowed from the Hostinvo server's IP. Check the GRANT and cPanel → Remote MySQL. |
| Connection timed out / unreachable | A firewall blocks port 3306. Open it for the Hostinvo server's IP, or use an SSH tunnel (example 3). |
| Required WHMCS tables were not found | The database name is wrong, or the tables do not use the standard tbl prefix. |
| Status stays Pending | The queue worker is not running on your Hostinvo server. Start it and the import continues. |